As they was interest in my Vectrex Cartridge I decided to upload the sources for the program that is capable of arranging multiple vectrex roms in a big image that it suits the needs of the Cartridge adressing logic.
Please download it here.
It's a C program written on and for linux but it should be compilable under windows as well. You also get script files that tell you how to use it.

Your average computer science nerd on his journey to develop software and hardware for fun!
Thursday, December 26, 2013
Saturday, June 29, 2013
Vectrex EPROM Cartridge finished
Today the PCBs of my EPROM Cartridge arrived. Of course I soldered and tested it directly. The EPROM used here is the 272001 which is programmed using the already mentioned RR-Prommer.
 The image to burn is generated by a small linux tool written in C, which reads a list of pathes to ROM images and arranges them according to the limitations of the hardware.
The Cartridge contains 256kb of memory. Supported ROM sizes are 8kb, 16kb and 32kb. ROMs which don't fall into one category are expanded by the tool to fit one.
The hardware is rather simple but offers some glue logic to support the various ROM sizes. All Images need to be aligned on their size. The used algorithm places the bigger ones at the beginning to simplify this problem.
At last the tool generates a list likes this here to tell you how you need to set the dip switches to select the wanted game.
Thrust -.---
Protector + Y.A.S.I -..--
Sadly I can't test the save feature yet as I've forgotten to add the needed EEPROM to the basket >_< doh.
And yes it does work like a charm. At first I did have a fear that my beloved Vectrex explodes (or implodes) but electrical engineering did again win this time.

Yaaayyy !!!! To convert the graphic of my snail I've written myself a tool in Java that grabs a SVG file and then fetches the koordinates of pathes out of it. I think they will be also one post about this soon.
Limitations compared to the a lot better VecMulti:

The Cartridge contains 256kb of memory. Supported ROM sizes are 8kb, 16kb and 32kb. ROMs which don't fall into one category are expanded by the tool to fit one.
The hardware is rather simple but offers some glue logic to support the various ROM sizes. All Images need to be aligned on their size. The used algorithm places the bigger ones at the beginning to simplify this problem.
At last the tool generates a list likes this here to tell you how you need to set the dip switches to select the wanted game.
Wormhole -----
Gravitrex --.--Thrust -.---
Protector + Y.A.S.I -..--
Sadly I can't test the save feature yet as I've forgotten to add the needed EEPROM to the basket >_< doh.
And yes it does work like a charm. At first I did have a fear that my beloved Vectrex explodes (or implodes) but electrical engineering did again win this time.

Yaaayyy !!!! To convert the graphic of my snail I've written myself a tool in Java that grabs a SVG file and then fetches the koordinates of pathes out of it. I think they will be also one post about this soon.
Limitations compared to the a lot better VecMulti:
- No Bank-Switched Games
- Image not allowed to be larger than 32kb
- Only one EEPROM for savegames.
- So only one saving game on one cart.
- Still: EEPROM has TO92 package and can be removed easily.
- No Debugging-Port
Tuesday, June 18, 2013
RR Prommer V1.0 EPROM Burner User Manual
For building the Z80 Minisystem I needed a cheap EPROM burner. I searched and found one. It was the "RR Prommer V1.0". This was back in 2008 or 2009. For the Vectrex Cartridge I will need it again as I wanted to have a simple design at first as I'm not possessing much knowlege about the internals of the Vectrex and the 6809 cpu.
But what is this? I can't find the manual. Just look at the programmer.

The type of EPROM you want to use has to be set using 5 jumpers. But without a manual it's rather difficult to know which settings is the right one.
So I googled a little bit and guess what. The Manual just has disappeared. The Internet actually has forgotten something. (At least I'm unable to find It with 20 minutes of searching >_<)
Luckily I digged It up again from a harddrive of my last pc so I have it again. As other people als might have this problem I like to share it for download here.
Also If you are unable to find the software this guy here has developed a linux program to use it. zprommer.
It works as the "RR Prommer" is actually a clone from an old Batronix EPROM burner. I don't know anymore how I got this one. But It works great using the EPROMs 27C256. I can't say more now and I hope It works also with 27C2001. If not I'm pretty screwed :-D
Friday, June 14, 2013
Vectrex Homebrew Cartridges
Last year I got myself the famous Vectrex console.For those who don't know it: The Vectrex made by MB is the only homeconsole with a real vector graphics display as It was used in early arcade games like Asteroids, Lunar Lander and Tempest. Because of this design it's impossible to use a standard television with this system as these devices are only able to rasterize a picture line by line. Vector systems on the other hand directly control the beam of the cathode ray tube to draw dots and lines.
This is why the vectrex has a built-in monitor ... which can be destroyed by software.
Here is a picture of my unit.


According to Wikipedia the Vectrex has only 20 official games released in europe which is sadly not a lot. To overcome this problem and because programming games with vector graphics is awesome as hell this platform got a great homebrow community. A lot of these games are released on custom manufactored cartridges and also a few with integrated non-volatile memory for highscore savings (which is not common on this device). But not all of them.
As this device is not that popular not a ton of "flash cartridges" exist that let you burn your own games onto. A very good example is the VecFlash and the VecMulti made by Richard Hutchinson. Sadly both are sold out at least since 2012-08. I tried to contact him at that point but the status hasn't changed since then. Both cards were very sophisticated. In special the VecMulti which offers to load games from MicroSD and has a debugging port for homebrew development.
Another alternative would be to destroy an existing card by replacing the rom by an eprom and then use this one. Also you can use extra adress lines to select different games. This is how a lot of "MultiCarts" are designed.
A lot of time passed since then and I thought myself it would be funny to make a EPROM based solution myself. It will not be as great as the "VecMulti" but it will suit most of the needs. I finished a long ago started design today and ordered the PCB. So stay tuned.
The only downside with my design is the lack of backup memory which is used at least by the games Thrust, Protector and Y.A.S.I which are one of my favourites. I couldn't find schematics which show how that works and where the needed EEPROM is applied but the design is made flexible so it may be possible to add that later.
This is why the vectrex has a built-in monitor ... which can be destroyed by software.
Here is a picture of my unit.

Here is another picture of my units tube.

This "hole" is not photoshopped. The small dot indicates that the fluorescent layer was burned away at that point. Talking about "Killer Pokes" here. It's like a damaged pixel on a TFT monitor. It's always there and you have to look at it. Anyway....
According to Wikipedia the Vectrex has only 20 official games released in europe which is sadly not a lot. To overcome this problem and because programming games with vector graphics is awesome as hell this platform got a great homebrow community. A lot of these games are released on custom manufactored cartridges and also a few with integrated non-volatile memory for highscore savings (which is not common on this device). But not all of them.
As this device is not that popular not a ton of "flash cartridges" exist that let you burn your own games onto. A very good example is the VecFlash and the VecMulti made by Richard Hutchinson. Sadly both are sold out at least since 2012-08. I tried to contact him at that point but the status hasn't changed since then. Both cards were very sophisticated. In special the VecMulti which offers to load games from MicroSD and has a debugging port for homebrew development.
Another alternative would be to destroy an existing card by replacing the rom by an eprom and then use this one. Also you can use extra adress lines to select different games. This is how a lot of "MultiCarts" are designed.
A lot of time passed since then and I thought myself it would be funny to make a EPROM based solution myself. It will not be as great as the "VecMulti" but it will suit most of the needs. I finished a long ago started design today and ordered the PCB. So stay tuned.
The only downside with my design is the lack of backup memory which is used at least by the games Thrust, Protector and Y.A.S.I which are one of my favourites. I couldn't find schematics which show how that works and where the needed EEPROM is applied but the design is made flexible so it may be possible to add that later.
Tuesday, April 9, 2013
Not much new content at the moment
Someone might wonder why there is not a lot content in the last 2 months. The reason is a small phase of change in interest. At the moment I'm making some music for my YouTube channel which of course also takes some time. In parallel I've an ongoing masterthesis at the moment. So there is not much time left to hack some hardware and software. My interests are like sin() and cos(). So at some point there will again be more of that stuff here. I just want to let anyone know that I'm not gone or something like that. There is still a queue of posts I like to do. Especially my FPGA projects.
Saturday, February 16, 2013
PCBs for USB Datasette and Wiimote2Amiga arrived
My USB Datasette and the Wiimote-Amiga-Joystick-Adapter (now better called "Wiimote2Amiga") finally reached the state of being implemented on professional PCBs using the company PCB-Pool.
The cables that were required for the connection to the datasette and the C64 itself are now gone and replaced with an edge connector and a female connector. This way it's a little bit more compact and less "wiry".
It even has a "feature" that you get if you design hardware without looking at the port locations.
But as the main purpose of the device is the connection to the datasette without the usage of the c64 itself this is not that of a matter.
As this project never leaved the evaluation board before, this was my first circuit board with an LPC1768 controller. And of course this leads to some errors that are clearly visible in the photo.....
The current needed to drive this project is reduced by a fifth to 70mA (@5V) which is great for the Amiga 1200 which has a resistor in series at the joystick port effectively reducing the possible current you can draw.
Also the size of the device is now greatly reduced to 48x48 mm and should be small enough to be placed inside the "rear trap door" of an Amiga 1200 to make it even more compact.
To reduce problems with the C64's sound this board offers the possibility to disconnect the power supply of your computer from the device and a port to connect an external 5V source.
As I had a minimum order quantity with boards as small as this I decided to sell the remaining unequipped boards for the cost price if there is interest.
Of course there is no warranty and I'm a little bit pedantic about releasing source code. ;-)
 |
| 2 "USB Datassettes" and 3 "Wiimote2Amiga" Boards are left |
USB Datasette
 |
| Top: Old version with stripboard and cables. Bottom: New version with just one PCB. |
It even has a "feature" that you get if you design hardware without looking at the port locations.
 |
| WHY THERE IS IEC PORT? - Rage-Face from http://alltheragefaces.com |
Wiimote2Amiga
 |
| Left: STEITEC Evalkit Version, Right: New PCB with everything in one. |
 |
| The board equipped to my 1200 with plugged in bluetooth stick. |
The current needed to drive this project is reduced by a fifth to 70mA (@5V) which is great for the Amiga 1200 which has a resistor in series at the joystick port effectively reducing the possible current you can draw.
Also the size of the device is now greatly reduced to 48x48 mm and should be small enough to be placed inside the "rear trap door" of an Amiga 1200 to make it even more compact.
To reduce problems with the C64's sound this board offers the possibility to disconnect the power supply of your computer from the device and a port to connect an external 5V source.
Conclusions
In the past I preferred designing with stripboards as they could be developed and debugged easily and incremental. But the beauty and cleannines of real etched PCBs is just untouchable.As I had a minimum order quantity with boards as small as this I decided to sell the remaining unequipped boards for the cost price if there is interest.
Of course there is no warranty and I'm a little bit pedantic about releasing source code. ;-)
Sunday, January 20, 2013
Schematics and Binaries for the USB Datasette
As there seems to be interest for the USB Datasette I would like to publish the schematics and the other stuff you need to operate it. The pictures in this blog are rather low res. Please download the package at the bottom for high res versions.
But first....
Disclaimer and Advises
The device is dc coupled to the PC and there is no galvanic isolation. Also the device is dc coupled to your c64, zx spectrum, tapedeck and datasette. Keep in mind that it's possible to have multiple grounds which leads to ground loops. This might destroy your PC, your c64 and other stuff you loved to connect to it.
If something is destroyed by usage with this device I'm not responsible for it! So use it with your mind and at your own risks.
If you want get sure to have no ground loops don't operate it with a grounded PC. Use it with an ungrounded notebook!
Also there is no windows driver at the moment.....
The board is very old and the schematic was reverse engineered just right now. I don't claim that it's totally correct. It should be though......
For me the system worked with every tape image I've tested. But that doesn't means it works with all of them!
Schematics
To build it you need:1x PIC18F2450
1x Oscillator 48MHz
1x LED Bar with 10 LEDs (not needed but you see that a transmit is going on)
1x 1 PNP transistor (only if you want to use it with a c64 datasette)
1x 3.5mm Jack Port (if you want to connect it to a normal tape deck)
1x female header with 6 pins (optional)
1x male header with 6 pins (optional)
1x switch
1x USB B Port
and of course a few resistors. Please look inside the sheet to decide which one you need as some could be keeped out if you don't want to use a particular feature. The circuit is very variable and you can modify it as you need for your services. The connections to the spectrum are not part of this schematic. But If you are able to build this you will find the pinout. The most important part is the PIC18F2450 which receives the pulses from your PC and transmits them. Then you need a switch to activate the bootloader (if you use one), the oscillator and the USB B port.
 The possible connections are offered using two connectors. I differentiated using the gender of the ports to be sure that nothing is connected wrong.
Speaking for the tape signals both ports are the same.
The first is designed for a connection to a tape device and offers the control of the motor and has an input for the sense signal ("PRESS PLAY ON TAPE").
The second is used for a connection to a computer and has a SENSE OUT to tell a c64 that you have pressed play by starting the driver and a MOTOR IN to tell the driver that the c64 wants data.


Software and Stuff
Click here to download the package.
You need libusb and the program must either be used with root or you have to give a normal user access to the USB devices. You get a linux executable for 32 bit and 64 bit.
If you have problems using the software, possible suggestions or you have found an image that is not usable with this driver please let me know it. I will try to fix that.
Usage
After plugging the device in lsusb recognises it as:
Bus 006 Device 055: ID 04d8:00ef Microchip Technology, Inc.
If you just run the driver without any parameter you get this little help.
=== Slamy's USB Datasette Userspace Driver === Build 2013-01-20
slamysdatasette <file>.raw 44100 Hz / Unsigned 8 Bit Raw
slamysdatasette <file>.tap C64 Tape Image
slamysdatasette <file>.tap ZX Spectrum Tape Image
slamysdatasette <file>.tzx ZX Spectrum TZX Image
slamysdatasette test[0|1] Timing Test
sim Simulation
seek <Nummer> Seeking to a pulse
nosound No sound at result
nosleep No 5 seconds wait at the begin
To begin with the error messages are german and english mixed. If enough people are interested in a pure english version it of course will be made.
The simulation reads a tape image completly and tells you how much minutes and seconds the image will take to write. Also this tests wether the drive is able to read the image. First simulate, then write ! ;-)
The nosleep parameter is for the usage with a computer as for the tape deck you need to surpass the part of tape that is plastic and not writable. If you know tapes you know what I mean.
You need to use nosound at the moment. The program wants to play a sound if it has finished the dumping process. But the sound I use at the moment is a piece of music I'm not allowed to upload here. Just place a "turricanwin.wav" inside /usr/share/slamysdatasette/ and it will be played...
Also place "castlevanialose.wav" there which is played in case of an error.
The sounds that I recorded from the games for this purpose are the "Turrican 2 Level 1-1 complete sound" and the sound of dying in "Castlevania" for the NES. Just for you to know :3
So that's it. If you like to build it yourself please leave a comment If you had success or not.
Saturday, January 12, 2013
Let the FPGA experiments begin - Part 1
Tinkerings with FPGAs
Shortly before finishing the "Z80 Minisystem" I read about FPGAs and for the moment I thought that these devices are "the most awesome thing you ever see in your life". So of course I wanted to do a project with them. Again I was inspired by phil from retroleum as I instantly became a fan of his work.So how do you start? I was so crazy I didn't even thought about buying a evaluation kit! I've discovered that you can get a simple FPGA like the XC3S50 (Spartan-3) from Xilinx inside a QFP144 package. I never etched a printed circuit board before as I always worked with strip boards. Also I didn't wanted to start etching. So a solution for this has to be found...
And I went simply nuts as I got myself some solder adapters from Elk-Tronic to solder the FPGA onto it. After that, some really dirty work started as I took this naked adapter board and connected it with a lot of wires to a strip board having the power supply (3.3v,2.5v,1.2v) and a little bit of sram.
 |
| Now we are talking about tinkering (25.2.2009) |
 |
| It's like a chip with pink tentacles attacking the stripboard (25.2.2009) |

But as you might know a FPGA loses it's configuration without the power supply. Normally you would buy some xilinx platform flashes to save the configuration. But I had a better idea. I got myself some XC3S50AN (Spartan-3AN) FPGAs which do offer an internal SPI flash that can be used for configuration.
So fragile... :'-(
Luckily I got a reason for desoldering the FPGA for a new one as at this point my workplace started being possessed by an evil demon that causes my Spartans to be killed....Naah of course not! Sooner or later you will discover that FPGAs are rather fragile components. They break very easily. Let me list some reasons:
- unstable power supply
- the core voltage is 0.05v to high
- mistakes inside the datasheet
- floating inputs
- the weather is cloudy
- it's friday
- because they want to
So I removed it with a hot air gun and soldered a new one. As I didn't knew the fault was inside the power supply I just continued using it and ... after a few days I got the dead FPGA number 2 ....
The fact that this was causing it was clouded by the fact the FPGA can run with 1.26 at maximum. But it seems the regulator was just to unstable for this purpose. So i got myself some expensive ones that gave exactly 1.19v.
So I continued working on it and guess what. A copper wire broke of and this was an input on the FPGA. As the driver was missing a got an antenna and you know what this means..... floating inputs lead to higher current inside the chip and the next FPGA was destroyed. Just by open inputs. At this time I got really depressed for losing all my money on this stuff.... but I of course bought another one. (At this point I wasn't aware of the feature that you can enable internal pull-ups)
In midtime I switched from the XC3S50 to the XC3S50AN with integrated flash. These also don't need the 2.5v supply anymore which is great. What I didn't knew is that the I/O has changed in matter of clamping diodes. As you might know the Spartan-3 is a 3.3v only device. When interfacing 5v you need to levelshift. If you have a device with clamping diodes on it's input you can apply a 5v signal with a resistor in series. The voltage that is too much will overflow into the 3.3v supply and just disappears (talking simple). These clamping diodes are removed at Spartan-3A and Spartan-3AN devices which is not told explicitly inside the datasheet. So.... I burned about two devices until I read about it.
My working place became some sort of graveyard for spartan devices. I was sure that the Spartans from the movie 300 were a lot more resistant.
Back to work
After telling you about all the dying Spartans in my room lets continue on our journey.Before buying all this stuff I experimented a little bit with the webpack edition of Xilinx ISE (version 10.x at this time if I remember....). But of course for development you need a language.
Choosing a language
At this time we hadn't any courses in university about "hardware description languages" so I was not biased.If you look around there are two important languages: Verilog and VHDL. At this time I only knew that Verilog is more used in America and VHDL in Europe. I looked at both languages and tried to decide. I don't want to start a flamewar here as this is a well and emotionally discussed topic in forums.
But for myself I decided that Verilog is the better language as the Description of behaviour seemed to take a lot less code lines and the code itself was not very blown up. If you look at VHDL you have to write a lot of code to accomplish your task.
So I went for Verilog and studied it. Today I do believe that this choice maybe was a mistake as I live in Europe in which VHDL is the preferred language. It may be more difficult to get a job If i tell my hypothetical boss that I learnt Verilog in university :-D. But this is just a wild guess. The truth is these languages are very similar. If you understand Verilog you can read VHDL with ease most of the time. It's like reading C++ with Java knowledge.
At this point I will make a break as some of the last posts are just to big to be readable.
A few more words on old floppy media
Just some topic for in between.
Yesterday I found this video on youtube in which a guy is presenting the KryoFlux - USB Floppy Controller. You can compare this solution to the Catweasel I've mentioned earlier. Except this one ist controlled via USB.
I have to say that I didn't knew this thing before and If I wouldn't have my other solutions which are acceptable at this time I would probably buy it! The usage seems to be very easy, fast and "one-click"-like.
Friday, January 11, 2013
Z80 Mini System
Now to the stuff that really made me thinking about blogging in the first place. First something about the story.
Around 2008 while having a "school type education" for an "it assistant" I suddenly got interested into the Z80 and used some simulators to learn assembler. In fact it was the "ZEMU - Z80 Emulator by Joe Moore" I got from Thomas Scherrer's website. I don't remember the motivation any more. But I guess it had something to do with "real IT science" and algorithms in assembler. Also I don't remember why I decided to use the Z80. Maybe it was Phil, the guy from Retroleum which at this time has presented the CPLD based Z80 computer V3Z80P on his blog. I was fascinated and his "Z80 Boing Demo" with music from the game Hawkeye was immediately burned (or flashed) in my mind as it also was a very famous demo on the Amiga. This was the first time I read about CPLDs.
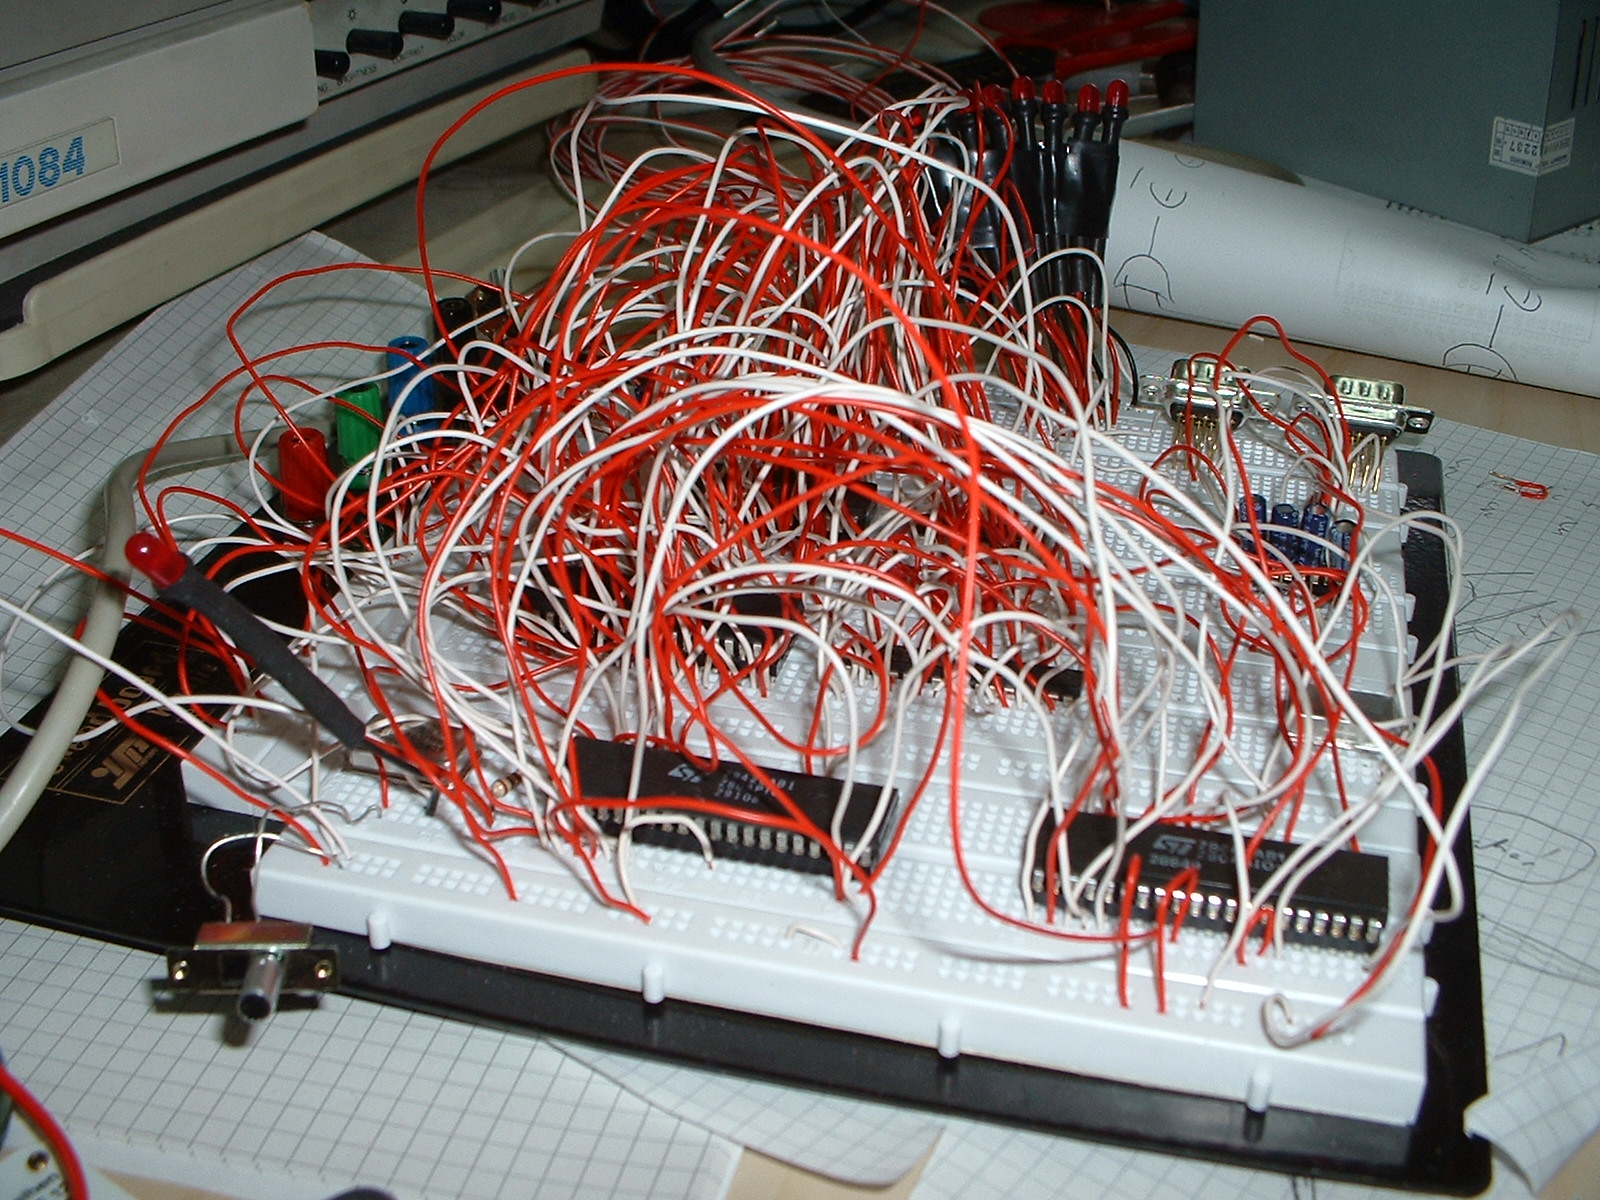
After developing some programs for testing my theoretical assembler skills I looked into the catalogue of the retailer reichelt and found actual Z80s I could buy. With the help of the datasheets I learnt about the bus interface of the Z80 and the peripherals that are also available by the vendor Zilog. These were the "Z80 PIO", a parallel port I/O chip and the "Z80 SIO", some small UART. Put that together with some glue logic and EPROM and SRAM and there you have it. Luckily I also got a very cheap EPROM Burner and some EPROM Eraser donated by a workmate. The result was created on breadboard.
It's a nightmare isn't it ? I LOVE it !!! After I got that working I created a stripboard with the same parts and added a "dot matrix character lcd" and some other stuff to it.
So what could this system do ? The Z80 is clocked with 4 MHz and had a DS1307 RTC connected via I2C whose value can also be seen on the picture above. The system has 32k EPROM and 64k RAM as two 32k SRAMs. The EPROM and one of the SRAMs can be bank switched to get all the RAM available. The LCD is connected to the PIO.
So... where do the programs come from. The operation system can bootload software using the serial port and the tape port !! :-D
I've found a circuit that was used to get clean digital levels from an audio cassette. I got it from some C64 website as it was intended for a "CDROM datasette". Sadly this website doesn't exists anymore. I've written myself a C program to convert binary data to an audiofile with pulsedata and some header to recognize the begin of data. If you play this it sounds a little bit like a ZX Spectrum program. This "music" was put on my Playstation Portable which is connected via cable for playback as I hadn't a good tape drive around.
Then I've programmed a tetris for it which definitely needs a video to show. Of course there is a atari type joystick port for this purpose that is read using a busdriver. The game uses the feature of the lcd to display 8 user characters. This way I got big pixels.
After a while I got rid of the nest below the board and replaced it with enameled copper wire. Wow, the board can finally touch the ground it's lying on!
So, this was my first touch with the Z80. The system helped me to understand the internal workings inside a computer system with "hardcore bare metal assembly development". I remember that in time this system was finished Phil from retroleum has developed his V4Z80P. I've read his article and was hyped like a little child. The first time reading about the magical wonderchips known as FPGAs and what they could do.
Stay tuned for the stuff I've built in 2010!
Around 2008 while having a "school type education" for an "it assistant" I suddenly got interested into the Z80 and used some simulators to learn assembler. In fact it was the "ZEMU - Z80 Emulator by Joe Moore" I got from Thomas Scherrer's website. I don't remember the motivation any more. But I guess it had something to do with "real IT science" and algorithms in assembler. Also I don't remember why I decided to use the Z80. Maybe it was Phil, the guy from Retroleum which at this time has presented the CPLD based Z80 computer V3Z80P on his blog. I was fascinated and his "Z80 Boing Demo" with music from the game Hawkeye was immediately burned (or flashed) in my mind as it also was a very famous demo on the Amiga. This was the first time I read about CPLDs.
After developing some programs for testing my theoretical assembler skills I looked into the catalogue of the retailer reichelt and found actual Z80s I could buy. With the help of the datasheets I learnt about the bus interface of the Z80 and the peripherals that are also available by the vendor Zilog. These were the "Z80 PIO", a parallel port I/O chip and the "Z80 SIO", some small UART. Put that together with some glue logic and EPROM and SRAM and there you have it. Luckily I also got a very cheap EPROM Burner and some EPROM Eraser donated by a workmate. The result was created on breadboard.
 |
| Top view (Feb 2009) |
 |
| SIO and PIO (Feb 2009) |
 |
| Side view on glue logic and max232 (Feb 2009) |
 |
| The Z80 Minisystem from the top. There is paper on the EPROM to keep the uv light away. The Z80 is to the lower left. PIO and SIO are in the middle clearly visible. |
 |
| The view from below. The nightmare continues. Try to repair a mess like this! |
 |
| And from the side. |
 |
| Yay for cheap operation system. Also I was lucky for having the assemble time printed as I wasn't sure about the photo time tag. |
So... where do the programs come from. The operation system can bootload software using the serial port and the tape port !! :-D
I've found a circuit that was used to get clean digital levels from an audio cassette. I got it from some C64 website as it was intended for a "CDROM datasette". Sadly this website doesn't exists anymore. I've written myself a C program to convert binary data to an audiofile with pulsedata and some header to recognize the begin of data. If you play this it sounds a little bit like a ZX Spectrum program. This "music" was put on my Playstation Portable which is connected via cable for playback as I hadn't a good tape drive around.
Then I've programmed a tetris for it which definitely needs a video to show. Of course there is a atari type joystick port for this purpose that is read using a busdriver. The game uses the feature of the lcd to display 8 user characters. This way I got big pixels.
After a while I got rid of the nest below the board and replaced it with enameled copper wire. Wow, the board can finally touch the ground it's lying on!
 |
| These enameled copper wires are sure a clean solution. |
Stay tuned for the stuff I've built in 2010!
Saturday, January 5, 2013
Evaluating the Turbo Chameleon 64
On one of my last posts I've mentioned the Turbo Chameleon 64 that I've given myself as a Christmas present for 2012 :3. Also as I started a blog I thought myself it would be cool to review this litte beast.
Reconfigurable computers are something really fascinating. They bring back the devices of our childhood in hardware manner even if the original ones are not existing anymore. (I'm still asking myself If my Amiga is still functional in 2030 :-D)
During the last years a lot of projects were creating implementing a device like this. To name a few:
C-One (2002?) C64, Amstrad CPC, ZX Spectrum and Minimig Port (look below)
Minimig (2007?) Amiga 500 compatible
MMC-216 (?) Amiga 500, C64, Atari 2600, Apple II
Turbo Chameleon (2011?) Minimig Port, C64, ZX Spectrum
The list is very incomplete and I don't claim that it is correct! I might have forgotten some cores and some products.
There are also some other projects on the way that seem to be not complete yet. The natami (Native Amiga) and the FPGA Arcade Replay Board. These seem to have working hardware for developers but not yet anything to sell to customers.
Well again I'm way of. :-D Lets return to the chameleon.
I have to be honest. I haven't bought myself a reconfigurable computer until now. (I've built one 2 years ago... more of that later). As I'm a retro nerd I bought all of my homecomputers in their original hardware as I've feared that the cores aren't really authentic or compatible yet.
Let's see If I was right.
At the time of writing I investigated the state of development with these cores:
Even without the docking station you are able to connect a mouse and a keyboard using the ps/2 ports. The tests were made using two very old TFT monitors with 1280x1024 from ~2005 (asus and videoseven) and a samsung hd ready tv from 2007.
Let's dive in !
Originally the chameleon was intended to be a expansion for your already existing commodore. It acts as somekind of mirrored chipset as you can decide which part of your hardware shall be implemented by the original device or the chameleon as it itself implements a sid, a vic II, a 6510 core (speed up) and a floppy station. There is even more but It's not my job to advertise it....
The question is .... do you need it connected to your already existing and working c64.... well....
It sure is an enhancement if you don't own a floppy station as the emulation seems to be really accurate with the games I've tested. But you still have to remember to enable it. Per default, the chameleon copies the program inside the image into the memory and executes it. In case of single loader games this is a quite good solution but not with multi loaders which need a real access to the image.
The SID emulation is quite limited. Even the VICE emulator is more accurate as the filters are missing at the current version. Let's see.... I own a real C64 because I want to have an authentic sound. There do exist hardware solutions for your pc because people in general like an authentic sound. The chameleon is still beta so I'm not allowed to nag about it. I just want to point this one out as I've first read about the limitation inside the manual.
The VIC emulation is accurate as far as I can tell. It's even very compatible to your monitor as you can choose between a few resolutions and frequencies. (The C64 in europe uses PAL. PAL uses 50Hz. VGA is minimum 60Hz). Per default 800x600@72hz is used. This seems to be usable but of course I've tried a little bit to improve. It turned out that 640x480@50 hz gives me an out of range. 640x480@60hz and @72hz gets me a strange crippled display. Any bigger resolution like 1024x768 has the effect that the display of the c64 is reduced to a very small window and the borders get somewhat big. With my setup the best result is archived using 800x600@50hz. This is even the true vertical frequency. I don't understand why @50hz is sharper than @72hz. I guess it has something todo with the monitor cable and inductive disturbance as the frequency is higher. Apart from that I'm happy with the picture. The colors are different but... hey... every C64 has different colors because of manufacturing differences at the analog circuit.
Sadly I get some motion blur during side scrollers. But this doesn't mean the chameleon is bad. It means my TFT monitors are ready to be discarded >:-(.
Apart from that the chameleon is able to act as a third party cartridge. I've tested the "Final Cartridge 3" as I also own a real one. Really helpful for loading acceleration. ;-).
Without a real c64 in standalone mode it's pretty much the same experience as if you would use your real c64 with an chameleon and don't use the original video and audio output. The ps/2 interface does it's job as the keyboard. I haven't tried it but you can use it even as an external floppy emulator using a IEC cable.
Another feature worth to mention is the file browser which lets you operate with d64 files. You can copy d64 images to floppy (very slow!), copy files inside the image, copy files from the image and you can play SID files on the sd card. This features is just AWESOME ... but not yet perfect. I experienced a few files (e.g. Katakis) that are not playable. But I guess this is not the fault of the sid player as this particular file is also not playable with sidplay64. I'll assume it has something to do with the programs loading address of the player program.
--Conclusion--
It works and does it's job. I really need to revisit this one with another monitor someday. At the moment I still prefer my real C64 with accurate sound and with a "high definiton" 1084 monitor as it seems to be the more retro way. Also I like the sound of my "environmental disaster" which is the correct name for the 1541 disk station :-D.
To copy disk images to real floppy the Chameleon is nearly unusable as you copy about 8 images with your XM1541 when the little yellow pal has finished the first.
If you do own a 1084 because you already have an amiga, choose wisely. You still need a floppy station and some games if you go for the real c64. I spent about 95€ on all my c64 hardware if I remember. If you don't like working with floppyedy floppies go for the chameleon. The fact the sid filters are missing is not THAT big of a deal as most of the times you won't hear the difference while playing the game.
After putting everything needed onto the sdcard (kickstart and menu code) I started it up and instantly got a problem.
As you can see the aspect ratio is wrong and some part of the image is
missing. What really saddens me is that this monitor doesn't allow a
manual setting of the picture in vertical ways but only horizontal. This
way it's impossible to get to the missing lines at the bottom.
The Amiga has the same problem as the C64 if you want to connect it to VGA but in some sort of extended version. The info screen of the monitor tells me it's displaying 640x480@50Hz. This is wrong as it should be something like 640x512. I guess the monitor is unable to recognize the correct resolution and tries to find something similar. But the used mode is not out of range so I still get a picture displayed.
Then I tried it with my asus monitor.
Argh!! The image fits perfectly. The aspect ratio seems to be correct and the picture is complete. But an ugly little window is displayed by the monitor. It says "AUSSER BEREICH" which is german for "OUT OF RANGE". I pressed all buttons but I doesn't want to go away >_<. The Samsung TV on the other hand just shows a black screen with "Not supported mode".
You have a problem here as you should use the amiga in PAL mode for compatibility. An alternative would be the usage of the NTSC mode which apparently solves the issue as it has a native resolution of 640x400@60hz which fits VGA a little bit better. But for what price. The games and their music are running to fast. Not to mention the PAL only games out there.
Apart from that the system seems to work. I can select ADF images, the game starts and I can play. The audio output is of really good quality.
I did have a few problems with the harddrive though. This minimig core offers you to select different styles of harddrive. It could be a HDF file in RDB mode that you might know from WinUAE and you can use a partition or even the whole sd card. The latter ways should be more performant in theory as the overhead of FAT management is not existend...
So I first tried to use a partition of the sd card as a harddisk but I couldn't get it mounted in linux. Keep in mind that you have a MBR partition table inside your sd card. Inside on of the partitions is a harddrive image with another RDB partition table. Linux was unable to understand that. We shouldn't even start talking about windows at the moment. Normally this works as I am able to mount the harddrive of my amiga 1200.......
But after using the HDF file I created with WinUAE everything went ok.
One thing I have to mention is that it is an amiga 500 with a lot of RAM and nothing more or less. Before buying the Chameleon I was used to some programs that need a 68020 as for example the great WHDload launcher iGame (has nothing to do with iPhone or iPad :-P). The core offers the optional cpu core called "020 alpha" and alpha is the name of the game as iGame crashes with the "guru 8000 0008". I'm used to some other type of guru message with iGame which tells you to replace the render.library. But no use here.... I guess the 020 core is still incomplete and a not yet functional instruction is used.
But a launcher is not essential to make WHDLoad work.... and It works as great as I am used to it on my 1200.
One thing I discovered (and should send to the author of the core) is a bug in the ps/2 to amiga mouse emulation that you might want to use if you don't possess a real amiga mouse which is unlikely as they break really fast....
A favourite game of my childhood is "Shufflepuck" which is a funny game about "air hockey". You control your paddle with the mouse and while doing so you do some fast movements with your hand. Now let's get technical:
--- technical stuff start ---
I assume the translation works just like yet another ps/2 to amiga mouse adapter. The adapter collects movement which is stored inside a variable. This variable is dec- or incremented as soon the adapter is able to quadrature modulate the movement to simulate the protocol that is used by normal mouses.
If you have a bad ps/2 adapter this variable is only 8 bit and tends to overflow. This way a fast move to right is converted to a fast move to the left for example. This is why my adapter has a speed setting and a 16 bit variable for the movement collection.
--- technical stuff end ---
So if you allready have a ps/2 adapter for your real amiga use this one as soon you get problems. Of course these do not appear on the workbench. it's just on games.
Now let's talk about compatibility. I've tried some games and a lot were working like a charm. One game that I somehow liked because of the soundtrack from Chis Hülsbeck is "Jim Power". I couldn't get this one working. I tried the WHDLoad version and one ADF image I've found. The ADF version simply crashes as soon a level starts. The WHDLoad one has no enemies :-D !!!! I'm totally unable to explain this.
-- Conclusion --
I really have to revisit this one with some newer monitor. A wrong display is simply annoying. To be fair I think I would get this result even if a put a scandoubler on a real amiga. Maybe it's possible to somehow transfer the video signal to a higher vertical frequency or scale it in hardware. But the first thing will lead to jumps or tearing and second would result into a bad quality. It's pretty difficult to decide here. The displayed picture is pretty sharp if you work with your workbench. It just reminds me of ... WinUAE :-D
There is a philosophical question about the difference between an software emulator and a fpga... I don't feel like discussing this right now. I just think about an amiga inside a raspberry pi. I wonder if this would work.
If you don't own a real amiga 500 or a amiga 1200 it might be some nice option. But if you own a 1200 together with turbo card and some great monitor I think you go better with this one. With the minimig port you miss the 68020 cpu and the AGA chipset which is needed by some games. I just think about "Super Stardust".
On the other hand the Spectrum offers some kind of charm and I somehow like the flare of it. So let's have a look at the spectrum core.
After putting everything needed to the sd card the spectrum boots directly into 48k BASIC which you either love or hate. Even the 128K core just uses this BASIC. I'm unable to understand that at this moment. The picture is kind of sharp and stable on the videoseven monitor. The Samsung TV says it's an unsupported mode.
This core has some very fascinating aspect as no tape drive is emulated. Instead it makes use of esxdos which is a firmware for a device called the divide. I don't want to get too technical yet but all you do for playing a game is pressing ShiftLock. After that a filebrowser starts up that lets you select some type of images. .Z80 and .TAP files do work well. .TZX, the most popular format is not supported but there is a reason for it.
.Z80 ist a simple snapshot format of the machines state. esxdos just takes it puts it into the RAM and starts it. Its kinda like starting a .PRG file on the C64.
.TAP is a tape image format more or less as it contains no pulsedata. Instead it contains the blocks of data that are saved on tape. No pulses but the data that is represented by them. This way this format is of course not useful for games with copy protection that tend to have crazy pulses to confuse normal loaders. But here is the trick. As you allready have the wanted data in it's wanted form esxdos seems to be capable of replacing the tape loader in the ROM and redirects the call to an internal handler to read tape data without a tape deck. I hope that wasn't to confusing. The effect is somewhat ingenious as this Spectrum loads tape images that are loading 3 minutes on a real device in an instant blink of an eye! I was simply amazed.
The downside is that you are unable to use .TZX images containg pulse data which are in general prefered If you use emulators. But that shouldn't be that big of a matter.
I tested a few games and all of them started and were playable for a few minutes (I didn't tested them fully)
Sadly I do have a problem with the mounting process with my sdcard. After you start the core the boot screen of esxdos is visible for a moment and then disappears to leave you alone in basic. After reading the manual and wildly penetrating the ShiftLock key I figured out that it failed to mount the card. The manual says you have to hold Space and press Esc, release Esc but keep Space holding. The boot screen of esxdos reappears again to flicker around desperately trying to get your card working. After a few flashes it says ok and you are allowed to press Esc again which resets your system to BASIC. And then ShiftLock gives you the launcher as promised.
I also found another solution that seems to work. After booting your Chameleon to the C64 core which it does normaly, remove the card and reinsert it. The next launch of the spectrum core seems to initialize the card directly on the first try. A little bit annoying... I guess the sd card initialisation code has to be fixed.
Also under normal circumstances you are unable to run "Turrican 2". I've mailed Alessandro Dorigatti and instantly got an answer. He mailed me that this game is a 128k game that also needs the 128k BASIC. He has given me instructions to get it working as it seemed to be an issue with esxdos. I don't know if I'm allowed to post that here but the reader sure knows where to dig^^. I want to thank Mr. Dorigatti and the author of esxdos for the fast help.
-- Conclusion --
The Spectrum Core works very well and is a real alternative to a real spectrum. I didn't have any issues with my monitor and the core of course also offers a kempston interface for your docking station. My personal highlight is the ultrafast loading of games which take about 3 to 34 minutes to load on a real machine. I could enjoy playing with this one instead of my real +2A system....
Reconfigurable computers are something really fascinating. They bring back the devices of our childhood in hardware manner even if the original ones are not existing anymore. (I'm still asking myself If my Amiga is still functional in 2030 :-D)
During the last years a lot of projects were creating implementing a device like this. To name a few:
C-One (2002?) C64, Amstrad CPC, ZX Spectrum and Minimig Port (look below)
Minimig (2007?) Amiga 500 compatible
MMC-216 (?) Amiga 500, C64, Atari 2600, Apple II
Turbo Chameleon (2011?) Minimig Port, C64, ZX Spectrum
The list is very incomplete and I don't claim that it is correct! I might have forgotten some cores and some products.
There are also some other projects on the way that seem to be not complete yet. The natami (Native Amiga) and the FPGA Arcade Replay Board. These seem to have working hardware for developers but not yet anything to sell to customers.
Well again I'm way of. :-D Lets return to the chameleon.
I have to be honest. I haven't bought myself a reconfigurable computer until now. (I've built one 2 years ago... more of that later). As I'm a retro nerd I bought all of my homecomputers in their original hardware as I've feared that the cores aren't really authentic or compatible yet.
Let's see If I was right.
At the time of writing I investigated the state of development with these cores:
- Beta-8c (nov 22 2012) Chameleon Core as C64 Core
- minimig core by tobiflexx (may 17 2011) as the first amiga core
- minimig core by retroramblings (jan 1 2013) as the second amiga core
- spectrum 48k and 128k core v2.1 by Alessandro Dorigatti. (Oct 12, 2012)
 |
| My setup. Isn't it cute? Of course it's compatible to my Wiimote-Adapter :3 |
Let's dive in !
C64
As it comes preinstalled with the system I first tried this one after first updating it to the latest version. The chameleon is surprisingly flexible as you can use it with or as an c64. Yes you've read correctly.Originally the chameleon was intended to be a expansion for your already existing commodore. It acts as somekind of mirrored chipset as you can decide which part of your hardware shall be implemented by the original device or the chameleon as it itself implements a sid, a vic II, a 6510 core (speed up) and a floppy station. There is even more but It's not my job to advertise it....
The question is .... do you need it connected to your already existing and working c64.... well....
It sure is an enhancement if you don't own a floppy station as the emulation seems to be really accurate with the games I've tested. But you still have to remember to enable it. Per default, the chameleon copies the program inside the image into the memory and executes it. In case of single loader games this is a quite good solution but not with multi loaders which need a real access to the image.
The SID emulation is quite limited. Even the VICE emulator is more accurate as the filters are missing at the current version. Let's see.... I own a real C64 because I want to have an authentic sound. There do exist hardware solutions for your pc because people in general like an authentic sound. The chameleon is still beta so I'm not allowed to nag about it. I just want to point this one out as I've first read about the limitation inside the manual.
The VIC emulation is accurate as far as I can tell. It's even very compatible to your monitor as you can choose between a few resolutions and frequencies. (The C64 in europe uses PAL. PAL uses 50Hz. VGA is minimum 60Hz). Per default 800x600@72hz is used. This seems to be usable but of course I've tried a little bit to improve. It turned out that 640x480@50 hz gives me an out of range. 640x480@60hz and @72hz gets me a strange crippled display. Any bigger resolution like 1024x768 has the effect that the display of the c64 is reduced to a very small window and the borders get somewhat big. With my setup the best result is archived using 800x600@50hz. This is even the true vertical frequency. I don't understand why @50hz is sharper than @72hz. I guess it has something todo with the monitor cable and inductive disturbance as the frequency is higher. Apart from that I'm happy with the picture. The colors are different but... hey... every C64 has different colors because of manufacturing differences at the analog circuit.
 |
| Original video comming from the C64 on a 1084 monitor |
 |
| At the same time the output of the chameleon |
Apart from that the chameleon is able to act as a third party cartridge. I've tested the "Final Cartridge 3" as I also own a real one. Really helpful for loading acceleration. ;-).
Without a real c64 in standalone mode it's pretty much the same experience as if you would use your real c64 with an chameleon and don't use the original video and audio output. The ps/2 interface does it's job as the keyboard. I haven't tried it but you can use it even as an external floppy emulator using a IEC cable.
Another feature worth to mention is the file browser which lets you operate with d64 files. You can copy d64 images to floppy (very slow!), copy files inside the image, copy files from the image and you can play SID files on the sd card. This features is just AWESOME ... but not yet perfect. I experienced a few files (e.g. Katakis) that are not playable. But I guess this is not the fault of the sid player as this particular file is also not playable with sidplay64. I'll assume it has something to do with the programs loading address of the player program.
--Conclusion--
It works and does it's job. I really need to revisit this one with another monitor someday. At the moment I still prefer my real C64 with accurate sound and with a "high definiton" 1084 monitor as it seems to be the more retro way. Also I like the sound of my "environmental disaster" which is the correct name for the 1541 disk station :-D.
To copy disk images to real floppy the Chameleon is nearly unusable as you copy about 8 images with your XM1541 when the little yellow pal has finished the first.
If you do own a 1084 because you already have an amiga, choose wisely. You still need a floppy station and some games if you go for the real c64. I spent about 95€ on all my c64 hardware if I remember. If you don't like working with floppyedy floppies go for the chameleon. The fact the sid filters are missing is not THAT big of a deal as most of the times you won't hear the difference while playing the game.
Minimig
This was the reason I've decided to buy the Chameleon in the first place. I've got a huge love for my Amiga and wanted to know how well the Minimig core manages to recreate it. I have to say that I have never seen the original minimig in live action. So this is my first time experiencing it with this port.After putting everything needed onto the sdcard (kickstart and menu code) I started it up and instantly got a problem.
 |
| Test of the minimig core with a videoseven tft |
The Amiga has the same problem as the C64 if you want to connect it to VGA but in some sort of extended version. The info screen of the monitor tells me it's displaying 640x480@50Hz. This is wrong as it should be something like 640x512. I guess the monitor is unable to recognize the correct resolution and tries to find something similar. But the used mode is not out of range so I still get a picture displayed.
Then I tried it with my asus monitor.
 |
| Test of the minimig core with an asus tft |
You have a problem here as you should use the amiga in PAL mode for compatibility. An alternative would be the usage of the NTSC mode which apparently solves the issue as it has a native resolution of 640x400@60hz which fits VGA a little bit better. But for what price. The games and their music are running to fast. Not to mention the PAL only games out there.
Apart from that the system seems to work. I can select ADF images, the game starts and I can play. The audio output is of really good quality.
I did have a few problems with the harddrive though. This minimig core offers you to select different styles of harddrive. It could be a HDF file in RDB mode that you might know from WinUAE and you can use a partition or even the whole sd card. The latter ways should be more performant in theory as the overhead of FAT management is not existend...
So I first tried to use a partition of the sd card as a harddisk but I couldn't get it mounted in linux. Keep in mind that you have a MBR partition table inside your sd card. Inside on of the partitions is a harddrive image with another RDB partition table. Linux was unable to understand that. We shouldn't even start talking about windows at the moment. Normally this works as I am able to mount the harddrive of my amiga 1200.......
But after using the HDF file I created with WinUAE everything went ok.
One thing I have to mention is that it is an amiga 500 with a lot of RAM and nothing more or less. Before buying the Chameleon I was used to some programs that need a 68020 as for example the great WHDload launcher iGame (has nothing to do with iPhone or iPad :-P). The core offers the optional cpu core called "020 alpha" and alpha is the name of the game as iGame crashes with the "guru 8000 0008". I'm used to some other type of guru message with iGame which tells you to replace the render.library. But no use here.... I guess the 020 core is still incomplete and a not yet functional instruction is used.
But a launcher is not essential to make WHDLoad work.... and It works as great as I am used to it on my 1200.
One thing I discovered (and should send to the author of the core) is a bug in the ps/2 to amiga mouse emulation that you might want to use if you don't possess a real amiga mouse which is unlikely as they break really fast....
A favourite game of my childhood is "Shufflepuck" which is a funny game about "air hockey". You control your paddle with the mouse and while doing so you do some fast movements with your hand. Now let's get technical:
--- technical stuff start ---
I assume the translation works just like yet another ps/2 to amiga mouse adapter. The adapter collects movement which is stored inside a variable. This variable is dec- or incremented as soon the adapter is able to quadrature modulate the movement to simulate the protocol that is used by normal mouses.
If you have a bad ps/2 adapter this variable is only 8 bit and tends to overflow. This way a fast move to right is converted to a fast move to the left for example. This is why my adapter has a speed setting and a 16 bit variable for the movement collection.
--- technical stuff end ---
So if you allready have a ps/2 adapter for your real amiga use this one as soon you get problems. Of course these do not appear on the workbench. it's just on games.
Now let's talk about compatibility. I've tried some games and a lot were working like a charm. One game that I somehow liked because of the soundtrack from Chis Hülsbeck is "Jim Power". I couldn't get this one working. I tried the WHDLoad version and one ADF image I've found. The ADF version simply crashes as soon a level starts. The WHDLoad one has no enemies :-D !!!! I'm totally unable to explain this.
-- Conclusion --
I really have to revisit this one with some newer monitor. A wrong display is simply annoying. To be fair I think I would get this result even if a put a scandoubler on a real amiga. Maybe it's possible to somehow transfer the video signal to a higher vertical frequency or scale it in hardware. But the first thing will lead to jumps or tearing and second would result into a bad quality. It's pretty difficult to decide here. The displayed picture is pretty sharp if you work with your workbench. It just reminds me of ... WinUAE :-D
There is a philosophical question about the difference between an software emulator and a fpga... I don't feel like discussing this right now. I just think about an amiga inside a raspberry pi. I wonder if this would work.
If you don't own a real amiga 500 or a amiga 1200 it might be some nice option. But if you own a 1200 together with turbo card and some great monitor I think you go better with this one. With the minimig port you miss the 68020 cpu and the AGA chipset which is needed by some games. I just think about "Super Stardust".
ZX Spectrum
Yay the Spectrum ! A lot of people I know are aware of the existence of the amiga 500 and the C64. But the Spectrum seems to be not that popular. Why? The original version doesn't has a sound chip (only a pc like speaker), no sprites and very limited graphics. And no floppy disk. Only the last Spectrum offers a disk drive... with 3" disks... :-O |
| And you thought 5 1/4" was strange |
After putting everything needed to the sd card the spectrum boots directly into 48k BASIC which you either love or hate. Even the 128K core just uses this BASIC. I'm unable to understand that at this moment. The picture is kind of sharp and stable on the videoseven monitor. The Samsung TV says it's an unsupported mode.
This core has some very fascinating aspect as no tape drive is emulated. Instead it makes use of esxdos which is a firmware for a device called the divide. I don't want to get too technical yet but all you do for playing a game is pressing ShiftLock. After that a filebrowser starts up that lets you select some type of images. .Z80 and .TAP files do work well. .TZX, the most popular format is not supported but there is a reason for it.
.Z80 ist a simple snapshot format of the machines state. esxdos just takes it puts it into the RAM and starts it. Its kinda like starting a .PRG file on the C64.
.TAP is a tape image format more or less as it contains no pulsedata. Instead it contains the blocks of data that are saved on tape. No pulses but the data that is represented by them. This way this format is of course not useful for games with copy protection that tend to have crazy pulses to confuse normal loaders. But here is the trick. As you allready have the wanted data in it's wanted form esxdos seems to be capable of replacing the tape loader in the ROM and redirects the call to an internal handler to read tape data without a tape deck. I hope that wasn't to confusing. The effect is somewhat ingenious as this Spectrum loads tape images that are loading 3 minutes on a real device in an instant blink of an eye! I was simply amazed.
The downside is that you are unable to use .TZX images containg pulse data which are in general prefered If you use emulators. But that shouldn't be that big of a matter.
I tested a few games and all of them started and were playable for a few minutes (I didn't tested them fully)
Sadly I do have a problem with the mounting process with my sdcard. After you start the core the boot screen of esxdos is visible for a moment and then disappears to leave you alone in basic. After reading the manual and wildly penetrating the ShiftLock key I figured out that it failed to mount the card. The manual says you have to hold Space and press Esc, release Esc but keep Space holding. The boot screen of esxdos reappears again to flicker around desperately trying to get your card working. After a few flashes it says ok and you are allowed to press Esc again which resets your system to BASIC. And then ShiftLock gives you the launcher as promised.
I also found another solution that seems to work. After booting your Chameleon to the C64 core which it does normaly, remove the card and reinsert it. The next launch of the spectrum core seems to initialize the card directly on the first try. A little bit annoying... I guess the sd card initialisation code has to be fixed.
Also under normal circumstances you are unable to run "Turrican 2". I've mailed Alessandro Dorigatti and instantly got an answer. He mailed me that this game is a 128k game that also needs the 128k BASIC. He has given me instructions to get it working as it seemed to be an issue with esxdos. I don't know if I'm allowed to post that here but the reader sure knows where to dig^^. I want to thank Mr. Dorigatti and the author of esxdos for the fast help.
-- Conclusion --
The Spectrum Core works very well and is a real alternative to a real spectrum. I didn't have any issues with my monitor and the core of course also offers a kempston interface for your docking station. My personal highlight is the ultrafast loading of games which take about 3 to 34 minutes to load on a real machine. I could enjoy playing with this one instead of my real +2A system....
The Big Conclusion
If you are- crazy about fpga technologies,
- crazy about reconfigurable computing,
- thinking about buying a
- minimig,
- c-one
- <place another similar product here>
- a retro nerd,
- or crazy in general
- not willing to experiment with possibly buggy cores and monitor modes
- somewhat SID audiophile (if need the C64)
- a high-end amiga user (if you need the minimig core)
- a xilinx fanboy that wants to hack that thing (it uses an altera fpga)
Wednesday, January 2, 2013
Slamy's USB Datasette
Let's have a look at the USB Datasette I've made about 2 years ago if I remember correctly. The purpose of this device is the writeback of legacy tape images to real tapes.
 |
| The device itself |
The device is constructed using some stripboard and a PIC 18F2450. The nice thing about this PIC is that it has a complete USB device controller that has a lot more features than your average "ftdi to uart"-solution.
A linux driver was built which is able to read spectrum (.TZX and .TAP), c64 (.TAP) and cpc (.CDT) tape images. It interprets the images and extracts the pulses that are used to encode the data. The length of these pulses are transfered to the pic using libusb and interrupt transfers. The program inside the microcontroller puts these inside a fifo and gives the resulting signal to the output.
 | |
| The whole kit |
The device offers three connectors as seen in the first picture above.
The left pin header next to the oscillator is used to connect to a tape
device. First a cable for the c64 datasette and then one that can be used for the internal drive of a zx spectrum +2A.
The female connector right next to it is used for a connection to a computer itself. It can be used for connecting a c64 and the internal header inside the +2A. The driver is also capable of stopping the playing process if the c64 disables the motor signal. In this case it operates as a tape emulator.
The last connector is your average line out but with reduced volume as it has to be connected the mic port of an tape recorder used for external connection to the cpc and the spectrum.
Let's have a look at some example photos.
 |
| Connected to a tape recorder |
 |
| Connected to a C64c |
 |
| Connected to a C64 datasette |
 |
| Connected to a ZX Spectrum +2A and it's internal drive |
A few words to the last picture: The Spectrum +2A doesn't offer the possibility to connect an external tape recorder like it was done with the 48k and the 128k. There exists a hack. But its a destructive one so i didn't used it. I've built myself a cable to extend the internal tape header to move it to the outside of the spectrum. This way I can connect the mainboard to the internal tape drive or an external source without opening it. Look at the photo as you can see both connectors hanging out.
Also as you can see there is a selfbuilt kempston interface as the "sinclair joystick ports" are pretty unusable if you don't own... sinclair joysticks ....
also the most games can handle kempston joysticks.
So this was everything I wanted to tell about this device, i guess. It took a few weeks to develop as a lot effort went into the linux driver. I don't know if its possible to port it to windows. The driver was written mainly in ANSI C so the only problem might be the part interfacing with libusb.
It's a very useful device and I've managed to write a few games using it. Of course these are official versions with copy protection and unmodified. I remember one game that my driver couldn't handle. It was a .CDT image with raw audio data inside. But that only happened once and an image like this is not very common.
A few words on old floppy and tape media for retro gaming
Happy New Year :3
If you own a C64, an Amstrad CPC, an Amiga or a ZX Spectrum you might know the problem with old media. floppy and tape lasts not a long time and soon you are confronted with a vanishing game collection.
There are a lot projects that are trying to work against this process. I consider these different ways:
(1) Don't use legacy hardware. Use emulators.
(2) Use reconfigurable computers.
(3) Buy games from ebay.
(4) Use Floppy / Tape-Emulators or alike
(5) Buy Hardware that can transfer images to blank media.
As a gaming console collector option 1 is not tolerable... no authentic video and no authentic sound.... especially in the case of the C64 and the NES.
Option 2 is not very common yet. There are a lot of products for some systems. For example minimig, the c-one, the mmc-216 and the turbo chameleon 64. These solutions are perfect for preserving legacy hardware for the future. At time of writing I do own a turbo chameleon and it's most of the time like an emulator in terms of authenticity and not even 100% compatible if you want to play games that are not well known. You can say emulators did have a lot of time to be lead to perfection.
Option 3 is awful as the bought media someday will also lose data after a few years. If you are really retro and you don't want to spend a lot of money on ebay the options 4 and 5 are the way to go.
To further differentiate the option 4 I would like to split it in true drive emulation and system expansions.
Take for example a few floppy emulators.
SD HxC Floppy Emulator for Amiga 500, Amstrad CPC, Atari ST and SD2IEC for C64.
I have to admit, I don't own one of these. And I can tell you why. You get some kind of "emulation load time waiting syndrome". Just try to use winuae for amiga emulation without any floppy acceleration. Sometimes you wonder if the software is still loading or maybe has crashed as you are unable to hear the step motor of your floppy and sense the loading process.
You can also say that something like this destroys the whole experience of your retro gaming session. The only benefit is the obsolence of physical media, which maybe is easier and doesn't needs any space of storage.
A different solution in technical meaning is the usage of software to archive the goal. The WHDLoad Project has the goal to crack modify amiga games to make them possible to be installed on a hard drive. No disk swapping (not even virtual ones). And NO loading times. divIDE is a hardware expansion that does something simililar on the zx spectrum.
I don't know a c64 solution, but MMC64 seems to be the way to go for single loader games.
So, If you want to go for fast loading and no physical medium the latter ones are the way to go. I do especially like WHDLoad as these modified games are less crippled and less buggy than the ones in the past that had to fight with available disk space.
After these tinkering words lets dive into my favourite possibilitly: Bringing the real physical disk or tape back to life with the usage of images and hardware support. I want to share the ways I've discovered during my retro gaming life.
My Solutions
Amiga - Floppy
I always wanted to have a catweasel controller. It's a very flexible floppy controller that is capable of writing various formats. Amiga, c64 and some others. But the price tag was at the level of an amiga 1200 itself, so i gave it a pass.
The first solution I discovered was the Amiga Explorer. That was 10 years ago :-D. It offers access to filesystem and storage devices over the serial port. You just need some sort of serial cable as the software could be paired happily with amiga dos 1.3 that is installed on most amiga 500 models.
But it was rather slow and took about 11 minutes for a disk transfer. :-(
After that i tried crossdos. It makes your amiga capable of reading 720kb FAT formated disks. Use a software to split the 880kb adf image, transfer it using 2 disks and write it back to an floppy using the marvelous programm adf2disk.
But also slow and tedious.
... of course you can also use a terminal software with xmodem....
After I bought an amiga 1200 2 years ago I discovered a much better and faster solution. Hook up a cheap IDE hard drive to it and buy a amiga network card. It was only about 15€ if i remember. Install the miami tcp/ip stack and the ftp server ftpd. Transfer adf images using ftp and write them again using adf2disk. If you actually possess an 1200 model this is really the way to go if you don't want to use whdload, which needs a ram expansion for preloading. And that costs a lot of money .... but it was worth it. I've expanded my 1200 using the aca1230 from individual computers.
C64 - Floppy
This is one thing the MMC64 was created for. Grab your d64 images, put them onto a sd card, slam this device in you commodore and dump them all on real disks. The only problem is that you need to buy it.... and it doesn't exists anymore as it is replaced by the turbo chameleon. And this costs 200€... but was worth it... anyway...
A very cheap and successful solution is the usage of a XM1541. This is a cable that connects to your average gigantic and power hungry 1541 floppy station and your pcs parallel port. You can then use a linux or windows program to transfer d64 images with a lot of comfort.... I have very good experience using the OpenCBM linux drivers.
There is just one problem. It needs a parallel port and to make it more awful it has to be a true 5V one. Last year I've bought a new computer and yes it has a parallel port. And NO!! its not 5V compatible. Of course an alternative is created. The XS1541... but there is a lot more hardware on it as it isn't just a cable.
So this is difficult. If you still have a pc with a "real" parallel port, go for the XM1541 as it is very cheap and gives fast results.
The turbo chameleon is insanely expensive if you just want to use it as a "floppy / mmc64 - emulator" but it sure is an easy solution I will soon try do discover. The floppy emulation works great but..... "emulation load time waiting syndrome" in it's worst case. I've tried loading turrican using this and I've asked myself 2 times if it crashed before even playing the first level. I'm such an impatient person. >:-)
Atari ST - Floppy
The Atari ST offers two different solutions. As it uses a floppy controller that is very simililar to the ones inside your pc you could just use some imaging tools to write the .st image to a disk. Very easy and cheap if you still own a floppy drive in your pc that you just bought in 2012 :-P. (Worked great with Rodland for example)
But a lot of games (Turrican, Turrican 2 to name a few) use a special disk geometry that could not be handled by the rather restrictive controller inside the pc. So you need a different solution and It took me a long time to find it.
I created myself a 720kb disk using my pc with the programs JayMSA, Ghostlink, HSModem and HyperFormater. Don't ask me where I got it. The disk is now a few years old.
Connect your atari st with a null modem cable to your pc and use dosbox with the dos master program of ghostlink. You get an atari st that has mounted a folder on your pc and can write a disk image which does the job quite well.
I think the atari st was the most difficult of the things listet here as these tools were scattered around. Also it has the same problem as the "Amiga Explorer" as the solution is very slow as the baud rate is limited to 19200.
Amstrad CPC - Floppy
EASY !!! EASY-EASY !!!
Same situation as with the atari st and !NO! special disk geometry. Just use disk imaging software and some adapter that can be easily built with 2€ to connect a 3.5" floppy to your cpc. I combine it with komacopy to copy the 3.5" to a real 3" (no spelling error here) floppy as I don't want to modify my cpc to be able to boot of the external drive.
The adapter is very simple. Just cut an average floppy cable and connect it to an centronics adapter. But before you do that, look at the back of your cpc as the german cpcs seem to have a different connector compared to english ones.
ZX Spectrum, C64, Amstrad CPC - Tape
Do you know the feeling if you just used a cracked image security backup of your game and it crashes because some cracker didn't do it's job right. It happens a lot on c64 and cpc games if you try some cracked modified floppy versions. So what do you do if you couldn't find any different floppy version. Without any special hardware it's impossible to dump the original floppy version to a real disk. Even finding it is rather difficult. Yes, you bite into the sour apple (you say that in german) and use the tape version... the original and uncracked unmodifed ones. Also on most spectrums you have to do so as only the +3 posesses a floppy drive.
So first you try to take your tapedeck, plug it in to your line out of your pc and then use some software to simulate the playing of the audio waves to dump the image back to tape. And yes it works. But most of the time only with cracked tape images. I can hear you laughing! Yes! There is a copy protection on music tapes. It works using rather high frequencies that could not easily copied using your average stereo with noise reduction and all that shit.
So you need some device that is able to replay the image in a better way than the soundcard of your computer.
Stay tuned on this channel for the next article !! :-)
I want to describle a tape emulator that I've build myself to overcome this problem.
Subscribe to:
Posts (Atom)