After some experimenting I've found out that it seems that the Fritz!Box has a non standard way of doing internal calls using pulse dial.
After picking up the phone and hearing the signal that your phone is ready for dialing you just have to do a manual click on the switch-hook a very short time.
Now the result should be 3 beeps, then a pause and then 3 beeps again.
The Fritz!Box uses this to give the indication that internal dialing is ready.
Now the dial without **.

Your average computer science nerd on his journey to develop software and hardware for fun!
Saturday, February 23, 2019
Fritz!Box 6490 Cable Pulse Dialing / Pulswahlverfahren
I wasn't able to find lots of information about the support of pulse dialing on the Fritz!Box 6490 Cable and just have experimented a little.
I currently use FRITZ!OS: 07.01 and I can confirm that an old telephone with rotary dial is working just fine.
Now on german....
Ich wollte mir gerne ein altes Post-Telefon mit Wählscheibe zulegen. In der Anleitung der Fritz!Box verliert AVM leider kein Wort darüber, ob das Pulswahlverfahren unterstützt wird. Ich konnte jedoch gerade experimentell ermitteln, dass es tatsächlich noch funktioniert.
Interne Anrufe sind allerdings problematisch, da diese normalerweise mit ** beginnen.
Man kann jedoch in der Fritz!Box die "Spontane Amtsholung" deaktivieren. Nach abheben des Hörers ist man im internen Modus und kann interne Nummern ohne ** wählen, während für externe Nummern stets eine 0 vorgewählt werden muss.
Ist die Frage was man möchte.... Mir ist leider keine Methode bekannt, wie man Stern und Raute-Taste per Pulswahl überträgt.
Saturday, November 10, 2018
Tiny Little Slug - Amiga Game in Development
My current project is an Amiga game of Metroidvania style.
It's called "Tiny Little Slug" and it's about a leopard slug which wants to eat a strawberry. Sounds insane? Well of course!
The whole game is developed in C++ (at least the current build is) and will have minimum system requirements of 512 kB of Chip mem and OCS chipset.
So every Amiga 500 should be capable of running this game.
Here is some footage:
My major inspiration is the game Snailiad by auriplane.
But the concept of my game will be different as no weapons are available and the main character is not capable of jumping. The gameplay will be focused on getting around the enemies as opposed to killing them.
The current release 0.0.3 can be downloaded here.
The game is far from finished. Consider it as an early demo.
You can read the changelog here.
It's called "Tiny Little Slug" and it's about a leopard slug which wants to eat a strawberry. Sounds insane? Well of course!
The whole game is developed in C++ (at least the current build is) and will have minimum system requirements of 512 kB of Chip mem and OCS chipset.
So every Amiga 500 should be capable of running this game.
Here is some footage:
But the concept of my game will be different as no weapons are available and the main character is not capable of jumping. The gameplay will be focused on getting around the enemies as opposed to killing them.
The current release 0.0.3 can be downloaded here.
The game is far from finished. Consider it as an early demo.
You can read the changelog here.
Wednesday, November 7, 2018
SlamySTM32Floppy now open source
Today I've decided to make SlamySTM32Floppy open source.
Click on the link to reach the github project.
Please keep in mind that this is now quite old and wasn't maintained for 2 years.
Some comments might be in german.
Click on the link to reach the github project.
Please keep in mind that this is now quite old and wasn't maintained for 2 years.
Some comments might be in german.
Sunday, April 15, 2018
How to configure Cinelerra for YouTube Upload
Thanks to this guy here I've finally figured out how to configure my Cinelerra setup to actually render YouTube friendly.
Whenever you upload a video to YouTube and the server is not happy about your codec settings it mentions that you should use these settings for better quality of your upload. I assume that using the correct settings prohibits reencoding the video on the servers. For years now I didn't care but on my last uploads I got encoding problems and video artifacts and now wanted to have the correct configuration in my setup.
The ffmpeg configuration suggested from mikoim is this one:
ffmpeg -i input -c:v libx264 -preset slow -profile:v high -crf 18 -coder 1 -pix_fmt yuv420p -movflags +faststart -g 30 -bf 2 -c:a aac -b:a 384k -profile:a aac_low output
The current release of Cinelerra removed the possibility to enter a custom ffmpeg command line in favor of a rather confusing graphical interface which is easy to learn but difficult to master.
In case you want it more graphic here you go.
My Cinelerra is set to german but it should look exactly the same.
Whenever you upload a video to YouTube and the server is not happy about your codec settings it mentions that you should use these settings for better quality of your upload. I assume that using the correct settings prohibits reencoding the video on the servers. For years now I didn't care but on my last uploads I got encoding problems and video artifacts and now wanted to have the correct configuration in my setup.
The ffmpeg configuration suggested from mikoim is this one:
ffmpeg -i input -c:v libx264 -preset slow -profile:v high -crf 18 -coder 1 -pix_fmt yuv420p -movflags +faststart -g 30 -bf 2 -c:a aac -b:a 384k -profile:a aac_low output
The current release of Cinelerra removed the possibility to enter a custom ffmpeg command line in favor of a rather confusing graphical interface which is easy to learn but difficult to master.
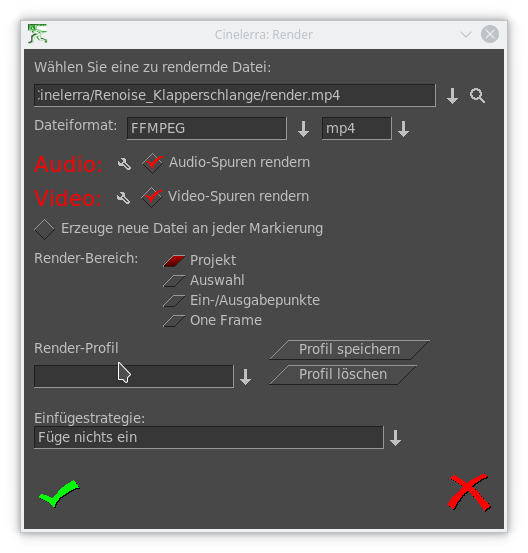
- Select FFMPEG as file format
- Select mp4 as output
- Activate Audio and open Audio Dialog
- Select h264.mp4 as profile which means AAC by default.
- Enter this in the Options field:
profile=aac_low - Enter 384000 into bitrate and -1 to quality.
- Close Audio Dialog.
- Activate Video and open Video Dialog
- Select faststart_h264.mp4 as profile.
- Set Bitrate to 0, Quality to -1 and Pixels to yuv420p
- Enter this in the Options field:
bf=2
coder=1
crf=18
profile=high
preset=slow
x264opts cabac=1:keyint=25
- Close Video Dialog
- Render! Yeah!
In case you want it more graphic here you go.
My Cinelerra is set to german but it should look exactly the same.
 |
| Render Settings |
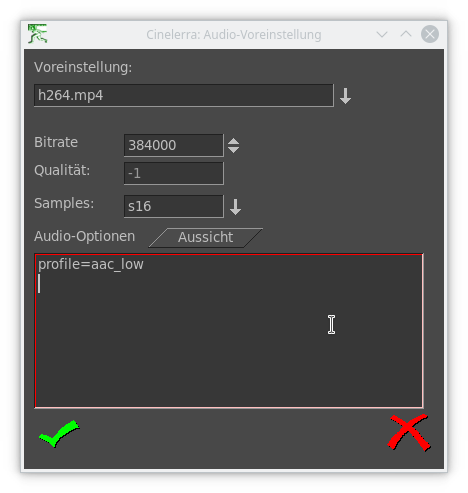 |
| Audio Dialog |
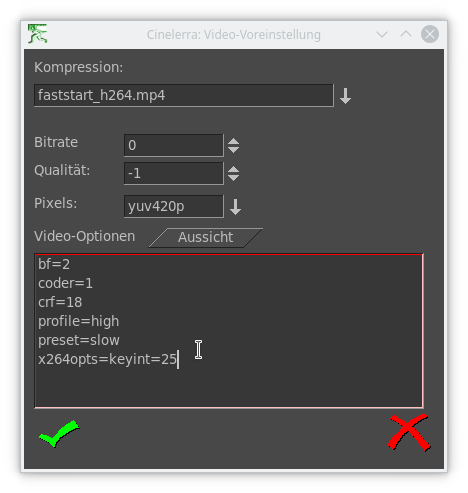 |
| Video Dialog |
Sunday, March 25, 2018
Everdrive VRC6 Test Application
I've learned some NES development and decided to build a testing application to verify the resistor used with the NES sound mod.
This is also my first open source project, yeah!
The sound level was evaluated using the emulator nestopia as It seemed to have high hardware compatibility.
Strangely enough I can't find a reliable source of the proper ratio between APU and VCR6 volumes. So all I can do is to rely on nestopia.
FamiTracker for example has exactly the same volume for a maximum level pulse wave of both sound chips.
https://github.com/Slamy/vrc6test
If everyone out there decides that I'm wrong with this program please don't hesitate and contact me.
Tuesday, March 13, 2018
Everdrive VRC6 Fix Update
The VRC6 Mapper for the Everdrive N8 was updated to support more volumes.
Download the new package here.
As before the name of the RBF file show the volume. 24Mod_75_70.RBF has 75% of maximum volume on High Setting and 70% at Low Setting.
Please keep in mind that the current version of the Everdrive have the Low Setting removed from the Options menu.
So only the first number is relevant now.
To install this mapper overwrite the 024.RBF file inside EDFC/MAPS with the file of choice.
As always I can't guarantee for proper function and the files are given as is.
I've tested a few of those RBF files but if they do damage your hardware it's your fault for modifying the Everdrive's firmware.
Subscribe to:
Posts (Atom)